|
|
|
Ken's Tomato
Machine
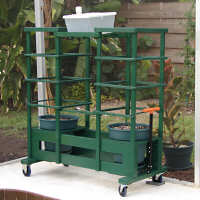
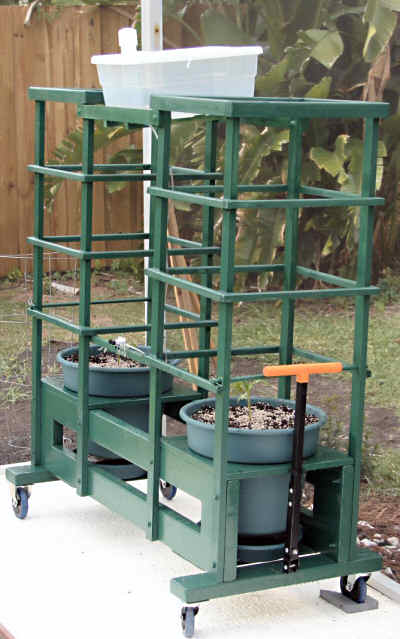
A roll around tomato growing stand to be
used on your patio or
lanai.
It features
two 5-gallon pots, drip watering and feeding, heavy cages to
ensure great plant support, and is easily moved about for
maintenance.
Author: Ken
Kemski
 | I started growing tomatoes in pots on my lanai last year. The
results were mixed, because my four pots were too small (3-1/2 gallons),
there was no way to rigidly stake the large plants, and keeping them
supplied with nutrients was a hassle. Pot grown tomatoes have their
nutrients flushed with every watering and rain, and it happens
quickly. The 75 or so tomatoes that survived were EXCELLENT,
however!
The end result was tipping stakes, sagging and broken
branches, tomatoes laying on the ground, and loss of at least half of
the tomato yield. I vowed to do something for the next growing
season (we have 2 each year in Florida), and I ended up building this
simple rolling stand. The cages are large and sturdy, providing lots
of support and tie points for any extra-large branches that develop.
The Celebrity tomatoes that I prefer can easily yield 50 large (12 to 16
ounce) tomatoes per plant, and that is a heavy load indeed.
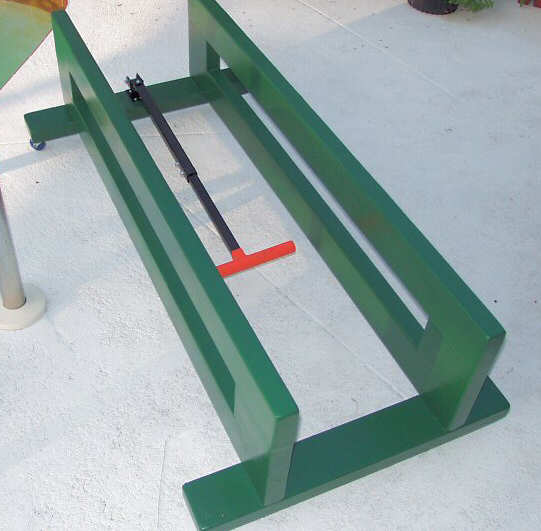
I
started with a base made from 2x4's clamped and glued together. It is 48"
x 15-1/2", and the bottom supports that the wheels mount to are 24" wide,
sticking out a little on each side for extra stability. This picture
shows the base, made entirely from three 2x4's. The
handle is a $7.50 Harbor Freight item.
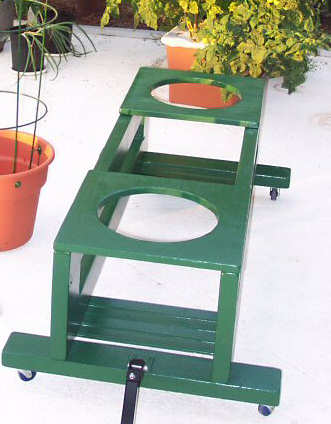
I then added some 3/4" plywood to
the top, cut to accommodate two 5-gal pots that I bought at
Wal-Mart. Be sure to buy and store a couple extra pots, should the
originals ever break. The small casters you see were replaced with
4" wheels from Harbor Freight after seeing the scale of the project up
close!
In the next picture you can see the 1x2 uprights that
support the cages being installed. I bolt those to the base with two
hex bolts, two nuts and four washers for each support. I then add
more 1x2 around the top of the supports for strength. Those I
simple glued and clamped.
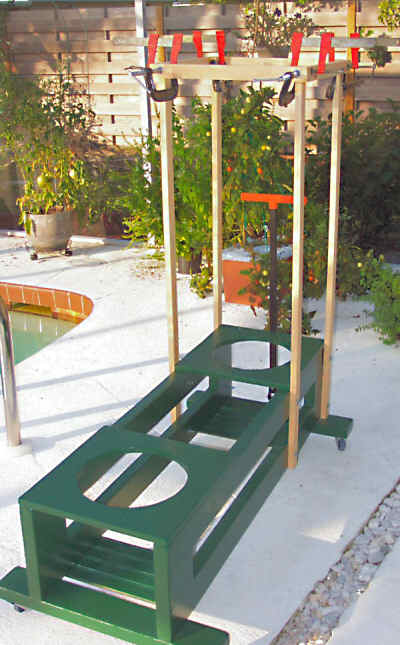
The next step was to attach some support rungs that I
made out of 3/4" x 3/4" x 4' stakes, that I bought in a bundle from
Wal-Mart. I just cut them to length, and glued and clamped those to
the 1x2 uprights. I used polyeurethane glue throughout the project -
It's waterproof. Here's what it looked like after gluing the
rungs in place, and painting them with some forest green exterior
latex.
I have a 3-gal drip watering system in place, where I
use an aquarium bubbler dual valve to adjust the drip rate to each plant
to a few drips/second. That feeds the plants for about 8
hours. I mix a weak solution of Miracle Grow for tomatoes and some
Epsom Salts and fill the top reservoir. I used a mixture of garden
soil and perlite, perhaps 3:1 for the potting compound. The "tomato
machine" tomato plants are outgrowing those I placed into the ground
at the same time, and are about double the size presently - Thay
are just about to poke out of the cage top!
|
|
Would you like to have a How-To page
like this one written by you, and hosted for you by dbeweb.com
?
It's easy, and it's FREE!
You provide
the information, we create and host the page for you.
Click HERE to find out how! |
|