Rehd's Board Straightener
Contact Rehd at rehdbrown@worldnet.att.net


Board Straightener
Construction and Use On Your Table Saw
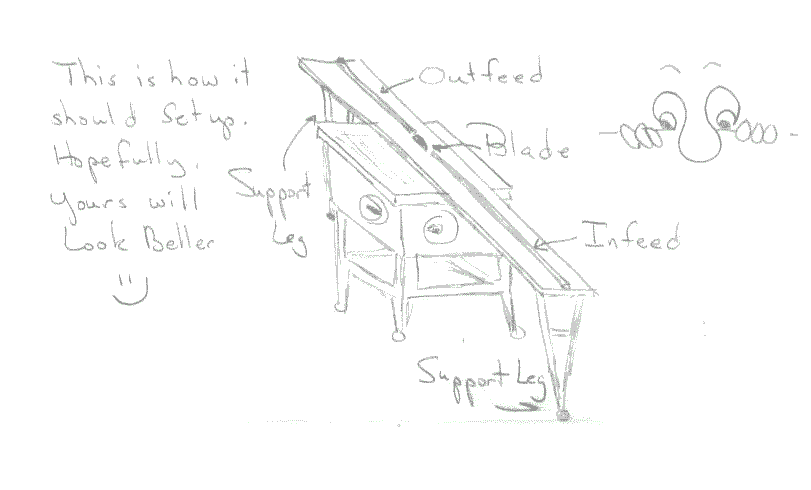
This is how I built MY board straightener, for MY Craftsman saw and your measurements may vary, but, the idea will be the same: Taking materials with only Two sides surfaced or those with a little bow in them and straightening them for maximun useage. I have made a couple of sketches to show approximately how it will look. Here is a step by step construction procedure to reach that end.
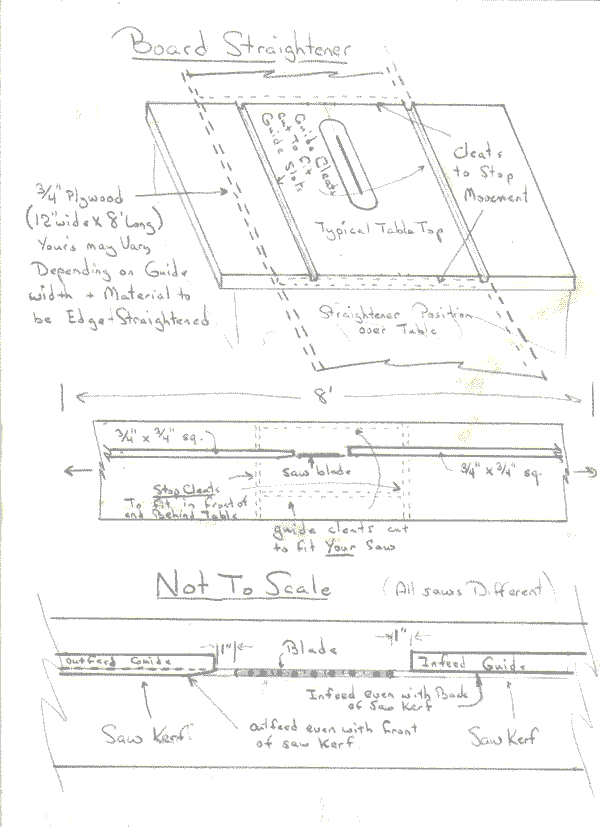
First you must determine the width of your particular straightener. I made mine 12" wide as it is 4" from the right guide slot to the blade, and I usually don't cut anything wider than 8" in rough stock. Most of the stock I purchase is between 4" and 8" and has only the faces surfaced. The edges are rough and uneven. Purchasing stock in this fashion is generally about 2/3's the price of S4S stock. So, when I get it home I have to straighten one edge in order to use it. I allowed myself 8" on the left of the blade for that purpose. The very minimum you would be able to go is the distance from the outer edges of both your guide slots on your particular table. After you have cut the appropriate width out of a sheet of plywood, 8' long, you are ready for the next cut. Set your fence to the outer edge of the right-hand guide slot( mitre guage slot ). Turn your plywood over so that the good side is face down, run the blade down so that it will only score the plywood around 1/32" deep, the whole length of the piece. IT IS VERY IMPORTANT THAT YOU USE THE SAME BLADE FOR THIS STEP THAT YOU WILL BE USING FOR YOUR STRAIGHTENING. This should be a 10" ( preferably carbide ). Turn the plywood back over and set aside. You need to cut 8' of 3/4" square stock to use as the material guides for the infeed and outfeed guides. Then, you need to cut two pieces of stock to fit into the two mitre-slots fairly snugly, slightly lower than the table and full length. That will depend on your particular saw as to thickness and width. Don't worry about the "T" slots in some saws, just cut it to fit into the major part of the slot. You also need to cut two cleats to use as stops for the front and rear of the table, so that your straightener will stay put when you are sliding stock over it.
Now you will need to center your blade position so that you have equal lengths of infeed and outfeed table. For most saws that will mean you will have more table saw in front of the blade than behind it, so you need to place your stop cleats so that the blade is in the center and the plywood won't move on the table. The right hand guide cleat will go on the right edge of the plywood, betweenn the two stops. The left cleat will be placed according to your saw and location. They MUST be straight, so that your plywood will fit snugly over the table without shifting at all. I usually use glue and brads to hold the cleats on. REMEMBER: The scored saw kerf is the top!! Once you have gotten all the cleats in place, and the plywood is solidly sitting on your table top, then you can turn the saw on and slowly run the blade up through the plywood until it is about 1" above the plywood. Stop there if you plan on only cutting 3/4 or 11/16" stock. You may have to hold down the plywood, being ever so careful where you put your hands or objects to hold it down. The blade should come up through your scored kerf.
Now, you can install the infeed and outfeed guides as per the sketches. They should come within one inch of the blade and be cut off at the ends of the plywood. IMPORTANT: This is what makes the whole thing work...... The infeed guide MUST be aligned with the right edge of the saw kerf all the way down it's length. The outfeed guide MUST be aligned with the left edge of the saw kerf, AND must have a slight bevel from the end to about 1" down it's length. NO abrupt edge when the material is feeding through. THAT'S IT
Two things I added to mine and are not really neccessary are hinged legs at the ends of the plywood, and I also used a plastic lamenent on my top surface for ease of cutting. You can wax the surface and the edges of the guides to help in moving material through. For heavier woods, the legs will keep the plywood from sagging at the ends from the extra weight. Hinge them and it's easier to stand up against the wall or store of a shelf.
ALWAYS CUT BOARDS WITH THE BOW FACING THE FENCE
When feeding material through the straightener, concentrate on keeping the material against the infeed table, but, as soon as you get about 1 foot of material on the outfeed side, switch your pressure to that surface and let the infeed side take care of itself. Remember that if the board is crooked or bowed, don't start the cut on the very end of the piece. You want to cut the curve off, so, average it out and cut towards the middle. It may take a couple of runs through to get your straight edge. You'll get the idea once you've cut a couple of boards on it.